21 tips, tricks and shortcuts for making movies on your mobile
Our resident mobile-auteur guides us through ten film-making apps, including iMovie, Hyperlapse and Kinemaster, revealing some of their cleverest features.
Owners of an iPhone 6S or an iPhone 6S Plus can record video footage in glorious 4K (that’s a frame size of 3,840 x 2,160 pixels), and it’s also supported on some flagship Android phones. However, it can take up a serious chunk of room — roughly 375MB per minute on your device’s internal memory. For those occasions when ultra high-definition playback isn’t important, or you’re just running out of space, dial down the resolution: on iOS, find the Photos & Camera option in Settings, and on Android open up the Settings panel in the stock Camera app. 2. Get creative with timelapse movies
You too can create one of those gorgeous-looking timelapse videos that regularly crop
up on YouTube, presuming you don’t need to move your phone for a few hours. On the iPhone, you’ll find the timelapse mode by swiping through the modes above the shutter button inside the Camera app; on Android, your options vary depending on your phone. Some handsets (like the Samsung Galaxy S6) support a timelapse mode out of the box but if your phone doesn’t have it you can use a third-party app such as Framelapse or Lapse It to do the job for you. 3. Invest in some extra kit
There’s now a whole host of kit out there for the budding smartphone moviemaker: tripods, lenses (such as the Olloclip), microphones and more besides. From making sure audio is picked up correctly to widening the field of view, these professional add-ons are more than just gimmicks and can make a real difference — if your phone is a popular flagship model (especially an iPhone) then you stand most chance of finding some suitable accessories, but it’s worth investigating what’s available. Any existing photography kit you’ve got to hand (such as spotlights) can prove useful for your movies too.
Kinemaster
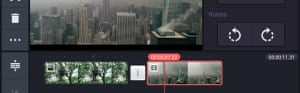
4. Rotate and mirror clips
Kinemaster is one of the most powerful and polished video editors you can get for Android devices, and among its features are a bunch of effects you can apply to the clips in your timeline. Tap on an individual clip, choose Rotate/Mirroring and you can flip a particular section of your footage or rotate it in 90-degree intervals: if you’ve somehow shot your video in the wrong orientation or the wrong way up (not that difficult if you’re importing from multiple devices) then this feature can get everything looking like it belongs in the same movie.
Another area where Kinemaster excels is in its use of photo, video and audio layers, enabling you to combine multiple files together in the same frame — for use with picture-in-picture effects, for example. Tap the Layer button from the main dashboard, choose Video or Image (note the former will require an in-app purchase), and you can drop in a new clip or picture as an overlay on top of the existing footage. Stickers and text can also be inserted as additional layers, while the picture-in-picture effect is available as one of the transition options in Kinemaster too.
If you’ve ever wanted to apply Instagram-style colour filters to your video clips, you’re in luck: that’s exactly what Kinemaster lets you do. Tap the video clip in question on the timeline, then choose Colour Filter to see what’s on offer: a wide variety of filters and colour casts are available, which can be applied with a tap. Alternatively, select Colour Filter from the previous menu and you get three sliders enabling you to change brightness, contrast and saturation levels on the fly. When you’re happy with how your footage is looking, tap on the tick icon.
iMovie for the iPhone and iPad is designed to be as straightforward to use as possible (you don’t have a mouse and keyboard available, after all) but one clever feature unique to the mobile apps is pinch-to-crop: using the well-established two-finger pinch technique you can zoom into a clip you’ve recorded and then chop out the extraneous borders. Tap on a clip in the timeline, tap the magnifying glass that appears and then pan and zoom around the current video frame as required (of course the latest 4K formats give you a lot more pixels to work with).
In case you hadn’t noticed, Apple wants to make it as straightforward for you as possible to switch between iOS and Mac OS X for every task, from email to photo editing. This philosophy extends to iMovie too, so you can start creating your movie masterpiece on an iPhone or iPad and then seamlessly export it to iMovie on OS X to finish the job: from within the iMovie mobile app, tap on the Share button and then choose the AirDrop or iCloud Drive option. You can then use the desktop application to open it and continue editing.
Another handy feature in iMovie for iOS is the option to slow down or speed up particular clips. With one selected in the timeline, tap the speed adjustment icon (which looks like a car speedometer) and then drag the slider accordingly — the app lets you go from 1/8x speed all the way up to 2x speed, and because the effect can be adjusted from clip to clip you can create some impressive results. To apply the effect to one part of a clip, split it into segments first (tap the scissors icon to see the Split option).
WeVideo’s impressive suite of apps cover the Web, Android and iOS, and come with all the key features you’d expect to find in a video editing tool — including the ability to add music to your clips. The right soundtrack can really turn your road trip movie from good to great, and the WeVideo Android app lets you drop in a track from its existing library or choose one of your own. With one of your clips selected, tap on the musical note icon and then select a track from those shown (or switch to the My Music tab).
Title cards are another area where WeVideo proves its worth, and you’ll see one inserted for you at the start of every video project you create in the Android app. Tap on the Title card to edit the text, then use the Theme button (which looks like a magic wand) to choose a style for your title cards to be applied throughout the project. The iOS version of WeVideo isn’t quite as advanced, but you can always export a basic project to the Web app where all of the editing features and file formats are available.
Clip is the stripped-down, mobile version of Adobe’s heavyweight desktop video editing application, and it’s available for both Android and iOS. One of its most useful features as far as casual filmmakers are concerned is the automatic mode that appears as an option whenever you create a new project and import some clips: choose to go automatic and the Clip app customises your footage based on a music track and speed chosen by you. It’s the perfect halfway house between sharing your raw video unedited and spending hours poring over every detail of the sequence.
Clip includes a more advanced freeform editor too, and one of the tools available in it is Photo Motion: this enables you to add photos to your movies while keeping some kind of movement so your project doesn’t grind to a static stop. Tap the cog icon at the top of the freeform editing screen to open the project preferences, then toggle the Photo Motion to the on position. You can’t control the zoom focus or speed, unfortunately, but it makes your project look more fluid if you’re mixing video clips and photos together in the same timeline.
If you’re serious about mobile moviemaking and you have a few pounds to spare, FiLMiC Pro is one of the most professional iOS filming apps available. You get access to a wealth of settings that most apps wouldn’t come close to thinking about, including live focus and exposure settings: drag the focus reticle (a square) or the exposure reticle (a circle) around on the camera view to set these values based on one part of the shot. The icons to the lower left lock these settings in place and prevent FiLMiC Pro from making adjustments on the fly.
15. Tweak white balance and contrast
More options become available in FiLMiC Pro after you’ve recorded a particular scene on your smartphone. Tap on the video clip icon to see your existing recordings, then tap the slider button to adjust exposure, contrast, white balance, saturation and tint using simple sliders, with the results previewed in real-time. The reset button on the left lets you undo all of your changes if you need to go back. Additional options on the same set of menus enable you to trim and downsample clips should you need to, before they’re ready to be exported to a video editor.
Installing the VideoFX Live app is like putting a fully featured editing suite inside the confines of your iPhone: from artistic titles to coloured overlays, there’s plenty to explore within the app. Some of the overlays and filters are aimed at a younger, social media-savvy crowd but there are a lot of genuinely useful ones too — such as the adjustable blur tool that you could use for anything from a dream sequence to a pre-credits intro. The blur effect is one of many you can get in the Cinema Pro Pack, a paid-for add-on to the app.
There are a plethora of ways you can use VIdeoFX Live on your iPhone, covering green screen effects, frames that border your video and so on, but the flame and explosion filters are some of the most dramatic tools. Via another premium add-on pack you can have flames rise from the foot of the screen, or have sparks, bangs and phaser effects flit across the screen in line with the movement in the frame. Of course the end results aren’t quite as slick as those produced by Hollywood studios, but they’re very impressive for an inexpensive smartphone app.
From Wallace and Gromit to Fantastic Mr. Fox, filmmakers continue to explore the potential of stop motion animation, and you can emulate the professionals using Stop Motion Studio (available on Android, iOS and Windows Phone). The app features overlay and grid modes to help you get each of your frames perfectly aligned, and everything can be compiled on your mobile device — there’s no need to switch to a computer editor to finish off your project. There’s also an automatic mode where images are snapped at regular intervals, saving you having to press the shutter button each time.
Stop Motion Studio supports the use of green screen effects, a tried and trusted movie technique where a coloured background (usually green, hence the name) is swapped out for a different image or video. By using a blank coloured material behind your actors (whether real or cut out of cardboard) it’s possible to replace the background with a couple of taps of your finger. The only downside is that the green screen feature is one of the premium paid-for add-ons in Stop Motion Studio, but it’s well worth the investment if you’re going to be using the feature regularly.
Hyperlapse from Instagram
20. Stabilise shaky video footage on iOS
Hyperlapse from Instagram is a spin-off of the photo filtering app that offers two key features: timelapse capture and video stabilisation. If you want to shoot clips that are smooth and cinematic even while you’re on the move then Hyperlapse is one of the best ways of going about it (for those using iOS devices at least) — capture your footage with the main shutter button and then choose 1x as the playback speed to end up with a finely stabilised clip which is saved to your photo gallery. Instagram and Facebook sharing options are also available.
Microsoft Hyperlapse
21. Stabilise shaky video footage on Android and Windows Phone
If you don’t have an iOS device then there’s an alternative app from Microsoft that does essentially the same thing — confusingly, it’s also called Hyperlapse. There are more speeds to choose from (1x to 32x) so you can choose video stabilisation or a timelapse effect, and another feature available here that’s not in Instagram’s alternative is the ability to import existing videos. Neither of these Hyperlapse tools have any advanced editing features to speak of, but you can use them to stabilise (or speed up) clips and then export them to other applications on your phone.


No comments:
Post a Comment